
Growing an avocado seed takes four toothpicks, a glass of water, and a windowsill: suspend the pit fat-end-down with its bottom third in water, refresh the water weekly, and a root and stem emerge on their own. From there it becomes a glossy, tree-shaped houseplant that cost you nothing but the guacamole.
How long do avocado seeds take to sprout? Typically 2 to 8 weeks in water, and yes, that range is wide, which is why this guide also covers the lesser-known method that regularly sprouts pits in half the time, plus the one prep trick (it involves peeling the pit like a boiled egg) that speeds up any method you choose.
Three more things the toothpick tutorials never tell you are all below: which end of the pit goes down, because getting this backwards is the single most common reason a pit sits in water for two months doing nothing, the case for skipping the glass entirely and planting straight into soil, and the honest answer to the question everyone is really asking, which is whether this thing will ever hand you an actual avocado. (Short version: probably not for many years, possibly never, and you should absolutely grow it anyway. The full math is in its own section.)
Cheat sheet at the bottom. First, the sixty seconds of prep that decide everything.
Prep the Pit (And Get the Right End Up)
Every avocado pit has a top and a bottom, and the plant refuses to negotiate on this.
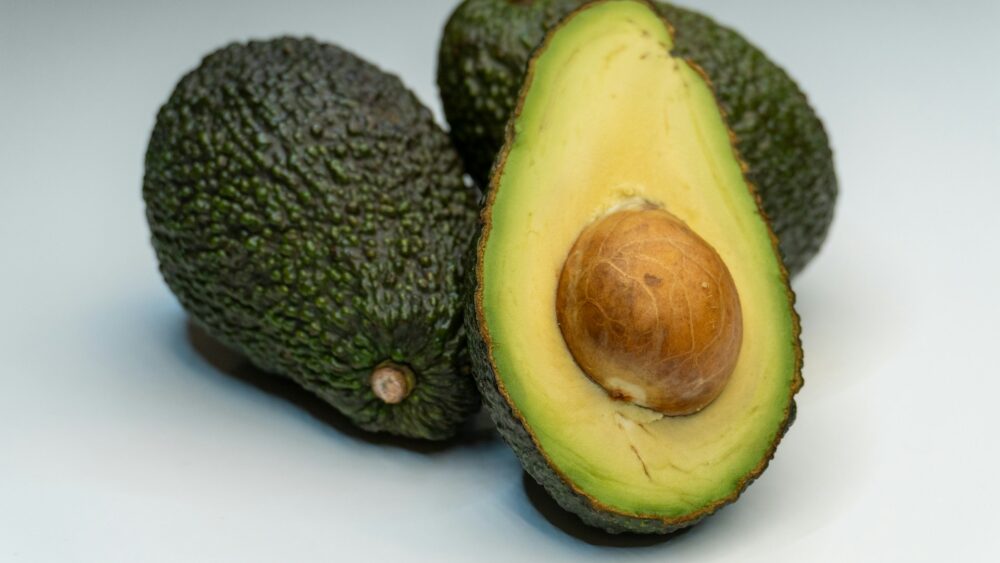
The bottom is the flatter, broader end. That is where the roots emerge, and it points down. The top is the pointier end, where the stem will break out, and it points up. On a very round pit, look for the faint dimple or lighter circle on the flatter side: that scar is the base. A pit installed upside-down will usually just sit there indefinitely, which quietly accounts for a huge share of “my avocado never sprouted” stories.
The prep:
- Ease the pit out of the fruit without stabbing it. A knife nick through the inner seed can stop germination before it starts, so spoon it out or pop it free with your fingers.
- Wash off every trace of green flesh under running water, gently. Leftover flesh is what turns a water glass into a mold experiment. Do not scrub away the brown papery skin while cleaning; whether it stays is a choice you make next.
- The peel trick: that brown, papery outer skin is a jacket the seed does not need. Soak the pit in warm water for ten minutes, and the skin peels away like the shell off a boiled egg. A peeled pit absorbs water faster, sprouts noticeably sooner, and lets you watch the seam crack open in real time. Optional, but it is the single easiest speed upgrade there is.
- Start two or three pits if you have them. Germination is never guaranteed, and spares turn a failed pit from a disappointment into a shrug.
Pit prepped, end identified. Now pick your method, and there are three.
Method 1: The Toothpick Water Glass (The Classic)
The famous method, and still a great one, mostly because you get to watch every stage of a tree being born on your kitchen windowsill.
- Push 3 or 4 toothpicks firmly into the pit’s midsection, angled slightly downward, spaced evenly around it like spokes.
- Rest the toothpicks on the rim of a glass or jar so the pit hangs with its bottom third submerged and the pointed top in open air.
- Park the glass somewhere warm with bright, indirect light. A windowsill out of harsh direct sun is ideal, and warmth matters as much as light: pits sprout fastest in rooms that stay comfortably warm.
- Change the water every 5 to 7 days, topping up between changes so the bottom stays submerged. Stale water breeds bacteria and mold, and murky water is the number one killer of water-method pits.
- Then watch the show: the pit’s seam splits, a pale taproot dives from the base, and eventually a red-brown shoot spears up from the top and unfurls leaves. Sprouting takes 2 to 8 weeks; a peeled pit usually lands at the early end.
One patience rule: do not evict a pit for slowness until 8 full weeks have passed with no crack and no root. Some pits are simply late. A pit that turns mushy, black, or furry, though, is done; that is rot, not slowness, and it is why the spares exist.
Want the same result faster and with less counter space? The next method is the quiet overachiever.
Method 2: The Paper Towel Bag (The Fast One)
This is how impatient plant people sprout avocado pits, and it routinely beats the water glass by weeks, often showing a root in 2 to 4 weeks.
- Wrap the cleaned (ideally peeled) pit in a damp paper towel. Damp, not dripping.
- Seal it in a zip-top bag or lidded container, and stash it somewhere warm and dark: a cupboard above the fridge, a pantry shelf, anywhere cozy.
- Check weekly: re-dampen the towel if it is drying out, and look for the seam cracking and a root emerging.
- When the taproot reaches about 3 inches, the pit graduates: either into a toothpick glass to finish as a spectator sport, or straight into a pot of soil, root down, which is where it was headed anyway.
Why it wins on speed: the pit sits in perfect, even moisture and warmth on all sides, with no light and no temperature swings, which is essentially a germination spa. The only tradeoff is that nothing about a bag in a cupboard looks charming on a windowsill.
Which raises the third option, the one the tutorials skip and half of avocado growers swear by.
Method 3: Straight Into Soil (The Stronger-Plant Argument)
You can skip the water phase entirely and plant an avocado seed in soil from day one, and there is a real case for it: roots grown in water are adapted to water, and moving a water-rooted plant into soil costs it a period of transplant shock while it rebuilds soil-type roots. A pit sprouted directly in soil never pays that tax, and soil-started avocados often end up sturdier plants a few months in.
- Fill a pot (6 inches or so, with drainage holes, always) with a well-draining potting mix. A standard mix cut with a handful of perlite or a cactus blend works well.
- Plant the pit fat-end-down, buried only halfway: the top half of the pit stays exposed above the soil line. Fully buried pits rot far more often than they sprout.
- Water until it drains, then keep the soil consistently lightly moist, never soggy, while you wait.
- Warmth and bright indirect light, same as before. Expect the sprout on the same 2-to-8-week clock, with the small suspense cost that the root show happens underground where you cannot watch it.
The honest comparison of all three: water glass for the spectacle, paper towel for the speed, soil for the strongest start. There is no wrong door, and plenty of people run a pit through each just to watch the race.
Whichever route you took, everything converges at the same moment: a rooted pit with a rising stem, ready for real life.
From Sprout to Houseplant: Potting and the First Cut
When to pot a water-sprouted pit: once the stem stands about 6 inches tall with a healthy taproot below. (Soil-started pits are already home and skip ahead.)
- Choose an 8-to-10-inch pot with drainage, filled with that same well-draining mix.
- Plant it exactly the way soil-method pits start: root down, pit half-exposed above the soil. Handle the taproot like the single point of failure it is.
- Water thoroughly, let it drain, and station it in your brightest window.
Then comes the cut that separates a tree from a beanstalk. Left alone, an avocado seedling grows one comically tall, bare, wobbly stem. To get a full, leafy plant: when the stem reaches 12 inches, cut it back to about 6. It feels like vandalism and works like magic: the stem responds by branching, and every branch means more leaves. Repeat the pinch on new growth whenever a branch runs 6 unbranched inches, and the beanstalk becomes a bushy little tree.
Growing Your Avocado Indoors (The Long Relationship)
An avocado plant makes a genuinely handsome indoor tree, big glossy leaves and real presence, and indoor care runs on four habits:
Light, and lots of it. The brightest window you own, ideally south-facing, with several hours of sun. A dim avocado grows pale, stretched, and sparse. In warm months, a vacation outdoors in dappled light (moved gradually over a week so the leaves do not scorch) puts on impressive growth.
Water when the top inch of soil is dry, thoroughly, then let it drain. Avocados dislike both drought and swamp; the top-inch check threads the needle.
About those brown leaf tips: nearly every indoor avocado eventually shows crispy brown tips, and it is usually salt, not neglect. Avocado roots are unusually sensitive to the chloride and mineral salts in tap water and fertilizer, which accumulate in the pot. The fix is a monthly flush: run water through the pot generously until it streams from the drainage holes, carrying the salts out. Filtered or rain water helps in hard-water areas, and any fertilizing should be light, a balanced houseplant feed at half strength monthly in spring and summer only.
Repot each spring into a pot one size up while it is actively growing; a happy avocado outgrows containers fast in its first years. In genuinely warm regions (roughly USDA zones 9 through 11), a seed-grown tree can eventually move into the ground outdoors, where it will try to become an actual 30-foot tree. Everywhere colder, it lives its life as a large, handsome pot plant that summers on the patio and winters indoors, always above about 50°F.
Which brings us to the question this entire project politely avoids until now.
Will It Ever Grow Actual Avocados?
The honest answer, in three parts, and it is worth knowing before you name the plant.
Part one: the wait is long. A seed-grown avocado typically needs 5 to 13 years of maturity before it is even capable of flowering and fruiting, and an avocado kept indoors in a pot usually never gets the light, the size, or the conditions to fruit at all. Outdoor trees in warm climates have a real shot; windowsill trees are ornamental.
Part two: the fruit is a mystery box. Avocados do not come true to seed. Your pit came from a Hass, but its genetics are a shuffle of its parents, and the tree it grows may bear fruit that is smaller, stringier, differently flavored, occasionally better, and most often just different. Every commercial avocado tree on earth is grafted, a branch of a proven variety fused onto seedling rootstock, precisely because seeds are a lottery.
Part three: the shortcut exists. If actual homegrown guacamole is the mission, buy a grafted nursery tree of a named variety, which fruits reliably in about 3 to 4 years, and can even be kept in a large container in cooler climates if wintered indoors. That is also the real answer to making an avocado tree bear fruit faster: fruiting speed is decided at planting by grafted-versus-seed, not by anything you do afterward.
So why grow the pit at all? Because it is free, because it is one of the best kitchen-scrap science projects in existence, because the resulting tree is legitimately beautiful, and because “I grew this from my lunch” never stops being satisfying. Grow the pit for the plant. Buy the graft for the fruit. Doing both is allowed.
Troubleshooting: When the Pit Sulks
Eight weeks in water, nothing: first, re-check the orientation, because upside-down is the classic culprit. If the fat end is truly down, give a healthy-looking pit two more weeks; some run long. Firm and intact means still alive.
The pit turned slimy, black, or fuzzy: rot or mold, and it is over for that pit. Next round: clean the flesh off more thoroughly, change the water on schedule, and keep only the bottom third submerged, since deeper immersion drowns and rots pits.
It cracked and rooted, but no stem for weeks: normal. The root always leads, sometimes by a month. A growing root is a living pit; the shoot is coming.
The seedling is pale, stretched, and leaning hard: light hunger. Move it to the brightest window in the house, and give the pot a quarter turn each week so it grows straight.
Leaves dropping after potting: transplant shock, especially in water-to-soil moves. Keep the soil lightly moist, keep the light bright, do not “help” with fertilizer, and new leaves typically return within a few weeks.
Brown crispy leaf tips: the salt story from the care section. Start monthly flushes and consider filtered water; the damaged tips will not regreen, but new growth comes in clean.
The Cheat Sheet (Save This)
Screenshot this before your next avocado toast.
Prep: wash the pit clean, fat end down, pointed end up. Peel the brown skin after a warm soak to speed everything up. Start two or three.
Water method: toothpicks, bottom third submerged, warm bright spot, fresh water every 5 to 7 days. Sprouts in 2 to 8 weeks.
Fast method: damp paper towel, zip bag, warm dark cupboard, check weekly. Root in 2 to 4 weeks, then pot it.
Soil method: pit half-exposed in draining mix, lightly moist, same timeline, sturdier plant.
After sprouting: pot at 6 inches of stem, pit half-exposed. Cut the stem back to 6 inches when it hits 12 to force branching, and pinch every 6 unbranched inches after.
Care: brightest window, water at dry-top-inch, flush the pot monthly for salt, repot each spring, keep above 50°F.
Fruit reality: 5 to 13 years outdoors if ever, rarely indoors, and never true to the parent. For real fruit in 3 to 4 years, buy a grafted tree, and grow the pit for the joy of it.
The Bottom Line
An avocado pit is a free houseplant with a two-month fuse: point the fat end down, keep it warm and watered by any of the three methods, make the brave cut at 12 inches, and the seed you nearly composted becomes the best-looking plant in the room.
Just sign the deal with clear eyes: this project pays out in leaves, not guacamole. The fruit comes from a nursery. The story comes from the windowsill, and the story is the better half anyway.