


100 Perfect Pick Up Lines for New Year’s Eve


If you are getting into trim work, baseboards, or simple woodworking projects, a brad nailer is often one of the first power tools that makes your life easier. This guide walks you through what it is, how it works, and how to use it safely and correctly, in simple, beginner friendly language.
A brad nailer is a light duty nail gun that shoots 18 gauge brad nails. These nails are thin and have very small heads, so they leave tiny holes that are easy to fill and hide under paint or stain.
Because 18 gauge brads are so slender, they are much less likely to split delicate trim, small moldings, and thin parts. That makes a brad nailer ideal for shoe molding, window and door casing, cabinet trim, and other finish details where you want a clean surface and minimal touch up.
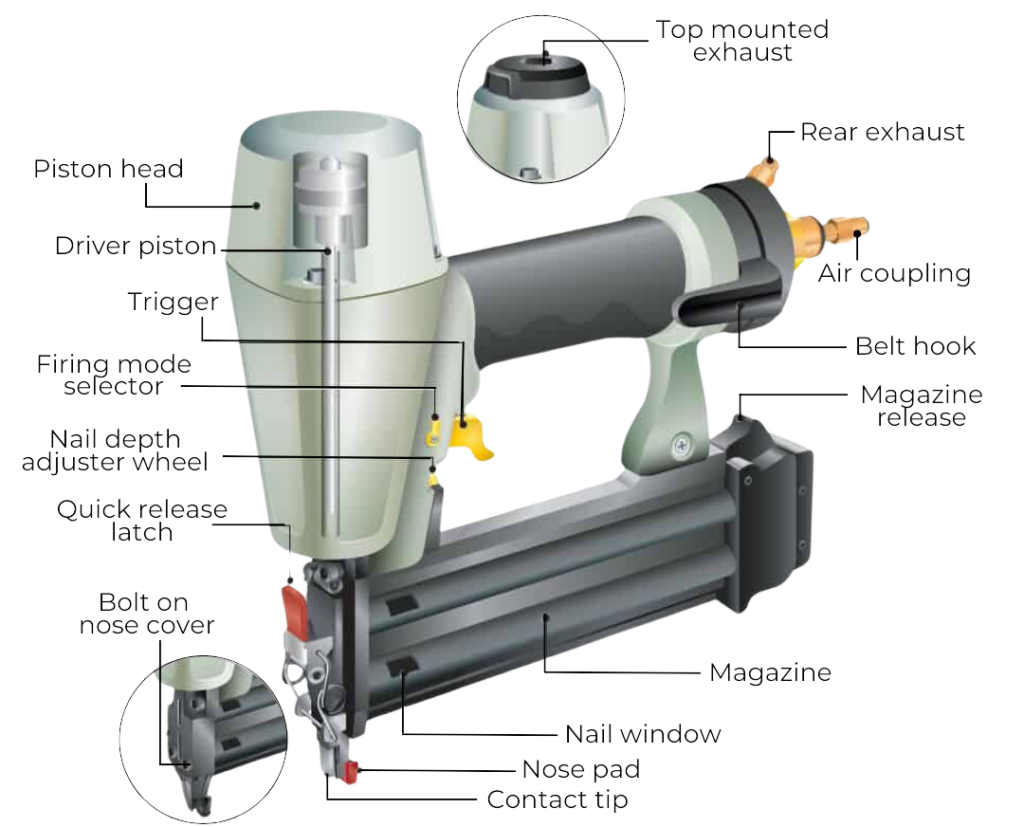
The trigger fires the nail when you pull it. The safety tip, sometimes called the contact tip, must be pressed against the workpiece before the tool will fire. This prevents accidental shots in the air.
The magazine is the channel or tray that holds the strip of brad nails. You slide the brads in, close the magazine, and a spring pushes them forward so each nail feeds into the firing area.
The nose is the front end of the nailer. The discharge opening is where the brad actually exits the tool and enters the wood. Many brad nailers have a narrow nose to help you see exactly where the nail will go.
Depth adjustment lets you control how deep the nail sits in the wood. Turn a wheel or dial to drive nails flush with the surface, slightly below for filling, or less deep to avoid blowing through thin stock.
Sequential firing means you must press the safety tip first, then pull the trigger for each nail. Bump firing lets you hold the trigger and tap the safety tip against the wood to fire multiple nails quickly. Sequential is safer for beginners. Bump is faster but needs more control.
If a brad bends or sticks in the nose, the jam clear lever or latch lets you open the front of the tool without extra tools. You flip it open, remove the stuck brad, close it, and get back to work.
Pneumatic models run on compressed air from a separate air compressor. They are usually lighter, since there is no battery or motor onboard. They often have strong, consistent power and are common on job sites. The tradeoff is the air hose and compressor, which reduce portability and add noise and maintenance.
Cordless brad nailers use rechargeable batteries and sometimes gas cartridges. They are very portable, since you do not need a hose or outlet. They are heavier and more expensive than most pneumatic nailers, but they are great for homeowners who do not want to buy and store a compressor.
Corded electric brad nailers plug into a wall outlet. They avoid batteries and compressors, but the power cord limits movement. These are less common than pneumatic or cordless, yet they can work well for small home shops that have easy access to outlets and do not need maximum power.
Gauge refers to nail thickness. The higher the number, the thinner the nail. An 18 gauge brad is thinner than a 15 or 16 gauge finish nail, which is why it is gentler on delicate trim.
Most 18 gauge brads range from about 5/8 inch to 2 inches long. Short brads are good for thin trim and small projects. Longer brads are used when you need to reach through trim and into framing or a solid backing.
The head on an 18 gauge brad is very small. This leaves a tiny hole that often disappears under a small dab of wood filler and paint. Typical uses include shoe molding, quarter round, small door and window casing, picture frames, cabinet face frames, and light decorative trim.
A finish nailer uses thicker nails, usually 15 or 16 gauge. It has more holding strength and leaves larger holes. Here is a quick comparison.
Brad nailer, 18 gauge, thinner nails
Finish nailer, 15 or 16 gauge, thicker nails
Brad, tiny holes, less chance of splitting
Finish, larger holes that need more filling
Brad, light holding power for thin trim
Finish, stronger hold for doors, baseboards, and heavy trim
Brad, delicate moldings, small trim, craft projects
Finish, baseboards, door jambs, window trim, stair parts
Brad, gentler on wood but limited strength
Finish, strong and versatile but more visible holes
Always wear safety glasses when using a brad nailer. Flying wood chips and brads can cause serious eye injuries. Ear protection is a good idea as well, especially with compressors and repeated firing.
For pneumatic nailers, set your compressor within the tool’s recommended range, often around 70 to 120 PSI. Start at the lower end and test, then increase if nails are not sinking enough. For cordless models, keep batteries charged and store them in a dry, moderate temperature area.
Before working on your actual project, use a scrap board of the same wood and thickness. Adjust the depth control until nails sit just below the surface without blowing through. Choose nail length based on the total thickness of your trim and backing. Hardwoods may need slightly higher pressure or shorter nails to avoid splitting.
Over driving nails can crush the wood surface and leave deep craters that are hard to fill. Fix this by dialing back the depth setting or lowering air pressure.
Nailing too close to edges can split thin trim, especially in hardwoods. Stay at least an inch from ends when possible, and angle nails slightly to reduce splitting.
Using the wrong nail length can cause problems. Too short, and the trim will not hold well. Too long, and the brad can poke out the back of the workpiece. Aim for a nail that is about two to three times the thickness of the trim.
Skipping construction adhesive when it is needed can lead to loose or squeaky moldings. For baseboards and larger trim, a thin bead of adhesive plus brads often gives the best long term hold.