


- ENTERTAINMENT
Unveiling the Best Blue Anime Characters

Brown is one of the most versatile and essential colors in any palette. It’s earthy, warm, and grounding, making it a go-to shade for artists, designers, and even interior decorators. From rich chocolate hues to soft sandy tones, brown connects us to nature and provides balance when used alongside brighter or more vibrant colors. But many beginners often wonder—how do you actually make brown paint? Unlike some other colors, brown isn’t found in a single tube; it’s a product of mixing. In this guide, we’ll break down exactly how to create the perfect shade of brown using primary and secondary colors, as well as how to adjust it for different uses.

The primary colors (red, blue, and yellow) are the foundation of all other colors. To create brown, you’ll mix these three in varying amounts.
Tips: Always add paint in small increments. It’s easier to darken or intensify a color gradually than to correct a mix that’s already too strong. Keep a palette knife or brush handy for thorough blending.
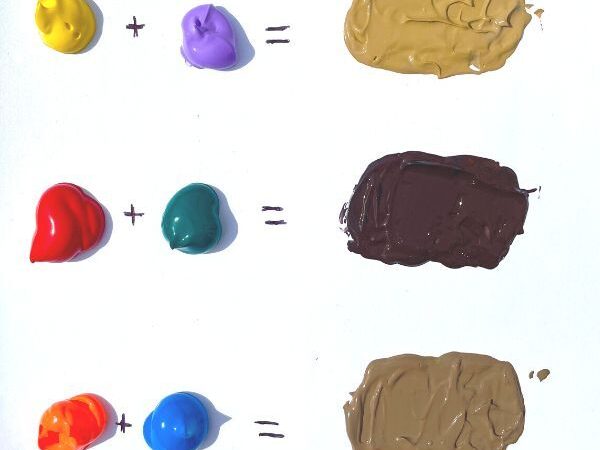
Secondary colors—green, orange, and purple—are made by mixing two primaries, but you can also combine them to create brown.
Tips: This method is great when you don’t want to use up your primary colors. If your mix looks too dull, brighten it by adjusting the dominant color slightly—such as adding more orange for warmth.
Once you have a base brown, you can fine-tune it:
Tips: Avoid adding too much black, as it can overpower the mix and make it muddy. If you want a rich depth, try using darker shades of blue or purple instead.
Always test your mix on a scrap piece of paper or canvas before applying it to your artwork. Browns can shift dramatically with small changes, so adjusting gradually is key. Blend carefully to avoid streaks, and consider layering thin washes of brown for added depth.
Tips: Keep a small mixing chart of your own browns for future reference. Document which colors and ratios you used so you can easily recreate your favorite shades.
Artists use different shades of brown in almost every subject: